
Script Lettering
Do you love inspiring phrases or adding some text to your embroidery? Lettering can be a new challenge when stitching. There are so many stitch options, it can be hard to know which one is right. Here’s the good news. There is no right or wrong here. You can choose what works best for you.
I decided to test some different outline stitches with some script lettering to see the differences. I chose the word “happy” to test. I just wrote on the fabric directly with a pencil. It’s light enough that it won’t show when I’m done stitching. You can also use a water soluble marker or heat erase marking pen if you’re more comfortable. If you don’t like how your script lettering looks, you can also find a font on the computer to print out and trace. I used four strands of floss in various colors. You might pick more or less strands depending on the scale of your letters.

An assortment of rainbow floss for stitching.
The first stitch I tried was Back Stitch. This stitch is easy to do, and works pretty well with the script lettering. The stitches will need to be small in order to follow along the curves, though. If you make your stitches too long, you’ll start to see some weird corners where you don’t want to. The lines of the stitching are pretty thin, so you get a more delicate look. You can see all the “dots” where your stitches start and stop which can be a design detail.

A sample of lettering using Back Stitch.
Since Back Stitch worked pretty well, I tried Whipped Back Stitch next. This stitch is done in two parts. First you’ll back stitch the whole word. Then you’ll come back through winding the floss around your stitches to whip it. Since you’re winding the floss around, you can make your Back Stitches larger than you did in the previous example. Any wonkiness around the curves gets smoothed out by the whipping process. This stitch is slightly wider than regular Back Stitch, but it’s noticeable taller. It adds more depth which can be really nice. This method does use more floss, too, since you’re essentially following along your words twice.

A sample of lettering using Whipped Back Stitch.
Another common stitch for lettering is Stem Stitch. For this stitch, you need to hold your working thread to the right as you stitch. In order to stay consistent throughout, I had to rotate my work a lot. If you prefer to use a stitching stand, this stitch might be a little bit more cumbersome to do. The result is a slightly thicker line since your stitches kind of overlap. I found that around some of the curves, it’s more difficult to get a nice smooth line. Following around the letter “a”, the stitches kind of fell into the inside, so it makes the opening smaller than written.

A sample of lettering using Stem Stitch.
If you’re struggling with Stem Stitch, you can try its counterpart, Outline Stitch. For this stitch, you hold your working thread to the left instead of the right. I followed the same path through the letters to see how it looked in comparison to Stem Stitch. I think this stitch followed the curves more cleanly. As with Stem Stitch, you’ll need to rotate your work as you go. I did find this stitch easier to do as a right-handed person. I could hold the working thread with my left hand while I had my needle in my right hand. It felt more natural.

A sample of lettering using Outline Stitch.
Split Stitch is another great choice for lettering. Your stitches can be longer than with Back Stitch because the split helps to even out wonkiness around curves. This stitch works great around larger curves. If you have a tight curve, like in the bottoms of the “p’s”, it doesn’t lay as nicely. There’s not as smooth a transition here. This stitch is a little bit more bold than Back Stitch, but it’s not too thick.

A sample of lettering using Split Stitch.
If you’re looking for another option, you can also try Chain Stitch. I did Reverse Chain Stitch here. It has the same look as Chain Stitch, but it’s easier for me to do, especially around the letters. These stitches are much bolder. If your script is too small, you might lose the detail with this stitch. Since this stitch has double the width of the other stitches I’ve shown, you can probably cut the number of strands you’re using by half in order to get the same width. I think this option would work best if you’re using large letters with a bold look.

A sample of lettering using Reverse Chain Stitch.
As you look at your own script lettering, you can choose the option that will work best for you. I find that with lettering, it can sometimes take a few attempts to get the right mix of number of strands and stitch choice to get the best look. Once you figure out what works for you, you’ll be able to jump right in. We would love to see what your lettering looks like. Reach out to us on Instagram. Happy Stitching!
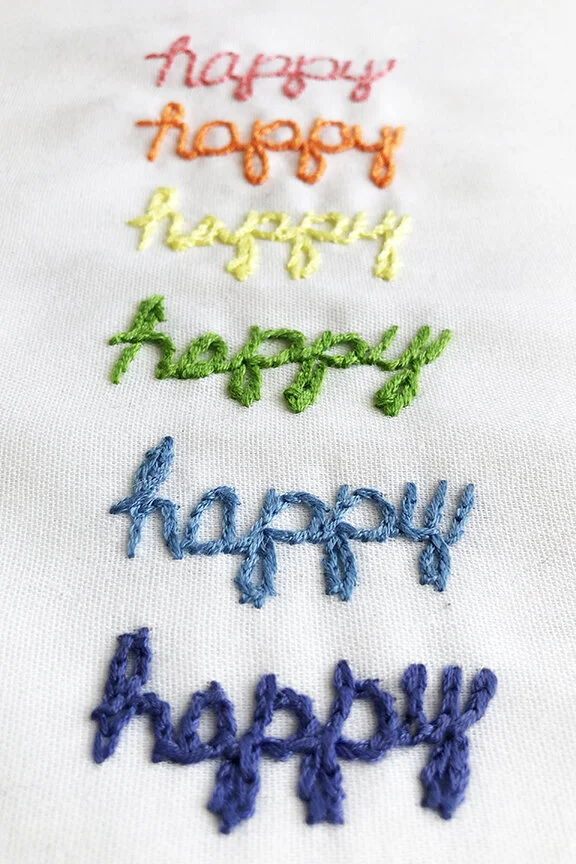
A collection of different stitches used for script lettering.